
Group and Collaborative Activities
Tutorials on creating and managing groups and collaborative activities in BrS.
To access BrS, go to https://brightspace.cuny.edu/ page and log in with your CUNY Login username and password. Bookmark this page on your favorite browser so that you can access it easily at any time.
How to create groups
BrS uses Categories to organize groups. You will need to create a category first, then create groups in categories. For example, if you want students to work in groups on projects, you can create a category called Projects.
Creating a category and setting up groups in the category
1. Click the Groups tab on the top navigation menu bar in your course. If you don't see it there, click More on the right-side of the top menu bar.
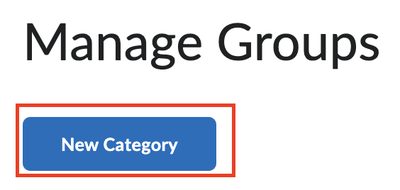
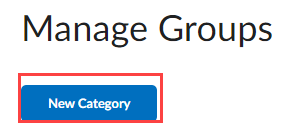
2. On the "Manage Groups" page, click "New Category."
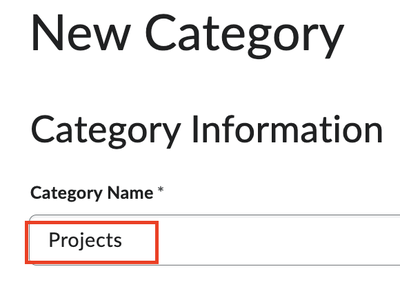
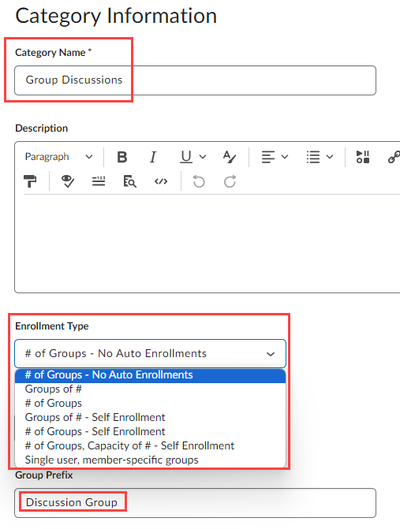
3. Under "Category Name" fill in a name for the category. In this example, it is Projects.
4. Add a description.
5. Scroll down to the "Enrollment Type" and click the dropdown box. As you can see, there are 7 enrollment types.
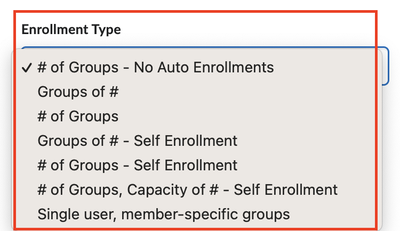
6. Watch the following video to learn the 7 group enrollment types and when to use each of them. Then select the one that fits your purpose.

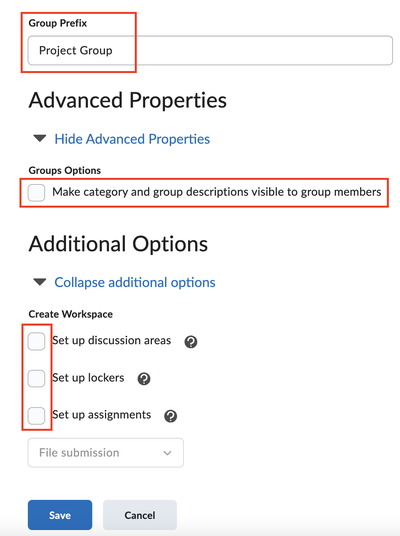
7. Add a group prefix. BrS will append numbers to it, e.g. Project Group 1, Project Group 2, ...
8. Under "Groups Options," check the box to make descriptions visible to students.
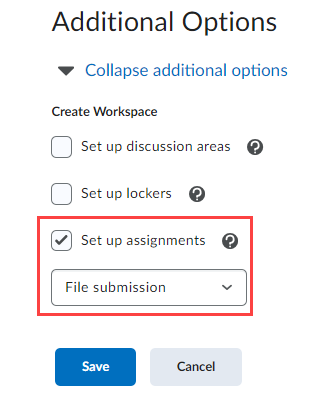
9. For additional options, choose the tool(s) you want groups to use. Group Lockers provide a storage space for groups members to share files. If you want groups to submit a final product such as a research paper or a presentation file, check the box to set up assignments. After you finish the settings, click Save.
- If you want to have group discussions, follow the steps in "Creating group discussions" section below.
- If you want to create group assignments, follow the steps in "Creating group assignments" section below.
- If you want to have both discussions and group assignments, check both boxes. This is useful when you have a group assignment. Group members can use the discussion area to exchange ideas about the group assignment.
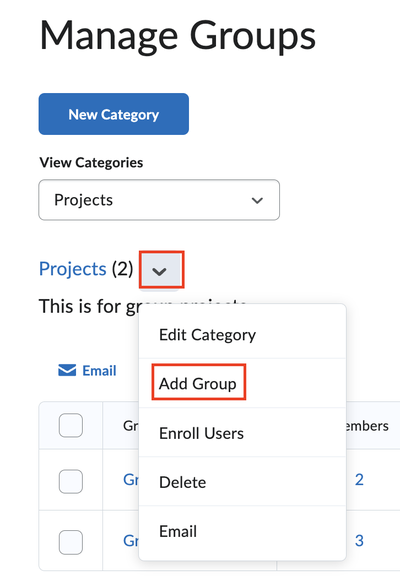
Adding more groups in a category
If you need to add more groups in a category, go to the Groups page. Next, select the category where you want to add more groups. Click the down arrow and then select "Add Groups."
Creating group discussions
There are different ways to create group discusison forums and topics. Here is our recommended workflow.
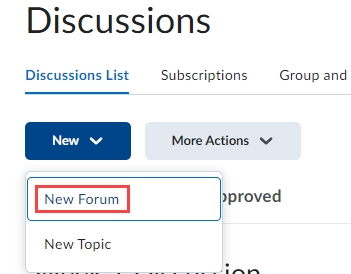
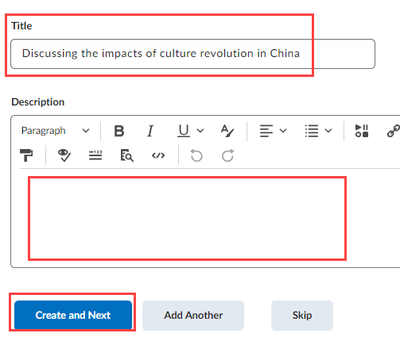
1. Click the Discussions link on the course top navigation bar. Then, click New and select New Forum.
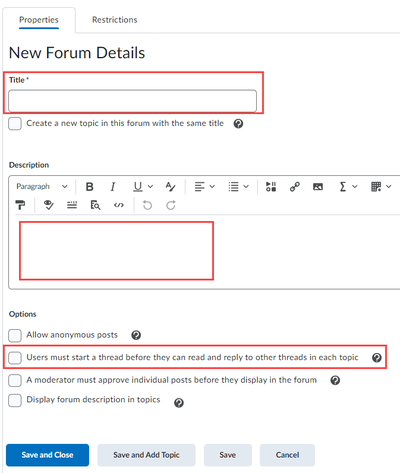
2. Add a Title for the forum such as "Group Discussions" and type in a Description. In the Options section, if you want students to see team members' posts after they post their initial response, check the box for Users must start a thread before they can read and reply to other threads in each topic. Then, click Save and Close.
3. Click the Groups link on the top navigation bar. Then click New Category.
4. Fill in a Category Name and optionally, a Description. Select the Enrollment Type. Add a Group Prefix. For example, if the group prefix is "Discussion Group," the newly created group names would be Discussion Group 1, Discussion Group 2, etc.
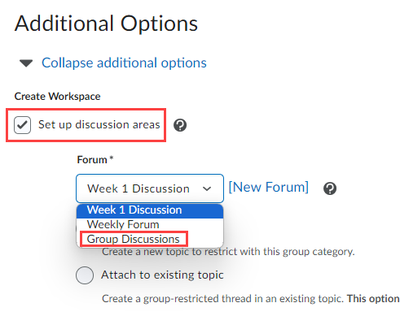
5. In the Additional Options section, check the box for Set up discussion area. In the Forum drop down box, choose Group Discussions in our example, or whatever the forum name you set up in step 2.
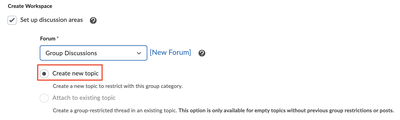
6. Click the radio button Create new topic.
7. Click Save at the bottom of the page.
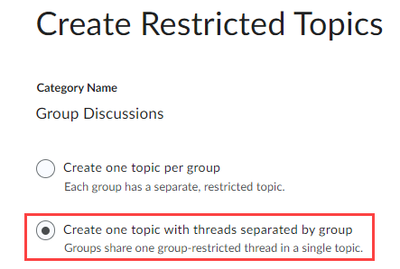
On the next page, it asks you to choose between two options. In both cases, students can only see the discussion posts from the members in their own groups.
- Create one topic per group: chosse this one if each group has a different discussion topic. If you enable grading the group discussion, you need to enable grading for each of the group topics and there will be multiple grade columns created in the Grades page, each for a group discussion topic.
- Create one topic with threads separated by group: choose this one if you want all groups have the same discussion topic. If you enable grading the group discussion, only one grade column is created in the Grades page.
If you choose to Create one topic per group
8. Check the radio button for Create one topic per group and then, click Create and Next.

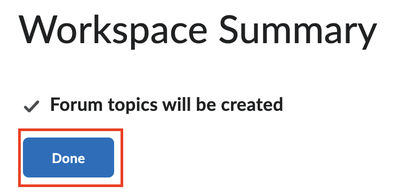
9. You receive a message sating that Forum topics will be created. Click Done.
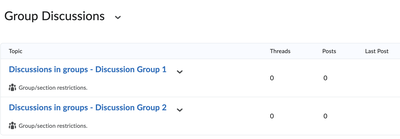
10. Go to the Discussions page from the course top navigation bar. You will see under the Group Discussion forum, there are multiple group discussion topics. In our example, two groups are created, so are the group discussion topics.
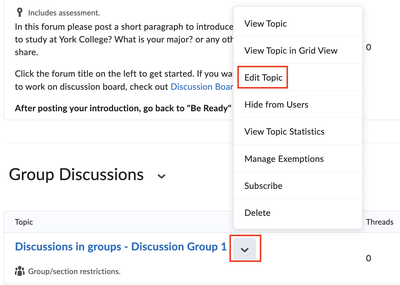
11. Click the down arrow next to a group topic and select Edit Topic.
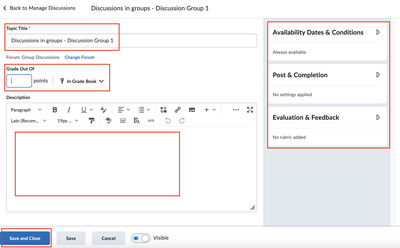
12. On the group discussion topic settings page, you can modify the Topic Title, enable grading by clicking the box under Grade Out Of. Fill in a number of points. In the text box for Description, type the instructions.
On the right-hand panel, expand Availability & Conditions, Post & Completion, and Evaluation & Feedback to set up various options when necessary.
When all done, click Save and Close.
Repeat steps 11 and 12 to modify the rest of the group discussion topics.
If you choose to Create one topic with threads separated by group
8. Continue to set up the discusison topic. Fill in a Title and, optionally a Description if you already provide instructions about the group discussions somewhere in your course. If you don't have a document to provide group discussion instructions, you should fill in the instructions in the Description text box here. Afterwards, click Create and Next.
9. You should see a message stating that the topic is created. Click Done. Now you complete the set up for group discussions.

The group discussion topic is created. Students can access it from either the Groups or the Discussions from the top nav bar.
Creating group assignments
1. In your category and group setup page, under "Additional Options," check the box for "Set up assignments" and select "File submission" in the dropdown box if you want to collect assignment files in the course site. Click Save.
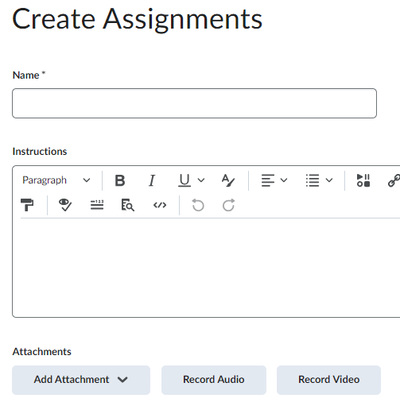
2. Type in a name and fill in the instructions for the assignment.
3. Choose appropriate options in the "Submission, Completion and Categorization" section.
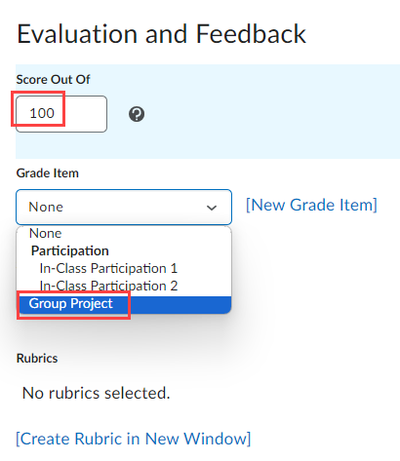
4. In the "Evaluation and Feedback" section, type in possible points. Under "Grade Item," click the dropdown box and select "Group Project." Create a rubric or select an existing rubric if needed.
5. After you finish setting up your assignment, click the "Save and Close" button.
Collaborating on documents in groups (New in BrS)
You can create group documents in your CUNY OneDrive and ask group members in each to work on one of the document collaborately.
Creating documents in your OneDrive and grant group members access
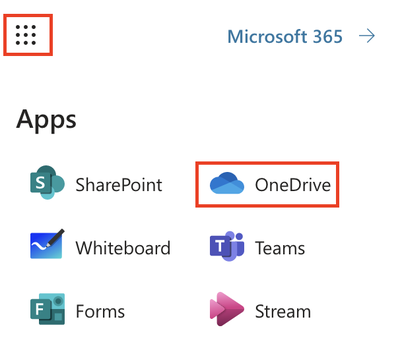
1. After logging in to your CUNY Office 365, click the waffle icon on the top left and then select OneDrive.
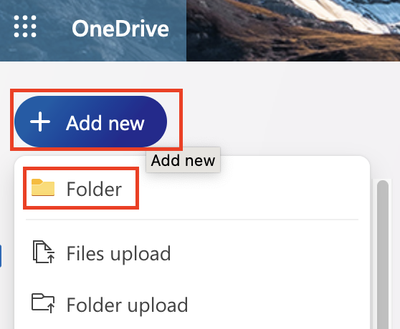
2. On your OneDrive page, click "Add new" and then select Folder to add a new folder. Fill in a meaning full name, e.g. ENG 125 KM Spring 2024 Group Projects.
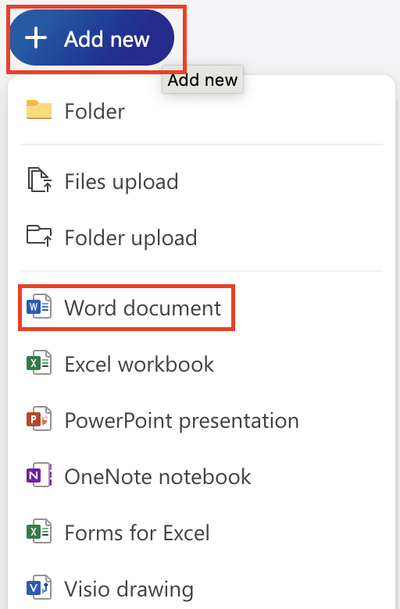
3. Go to your newly created folder. Click "Add new" again, but this time choose "Word document" or any other type of document that is appropriate for the group project. You need to create one file for each of the groups so that members in each group can work on their project document.
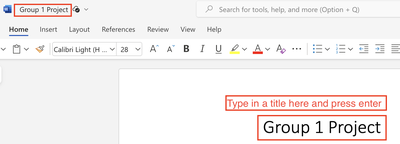
4. Fill in a title and press the Enter key. Now the title is filled in the file name field automatically. In this example, it is the document on which group 1 members will collaborate.
Repeat the steps 3 and 4 to create documents for other groups.
Now you need to give the group members access to their respective group project files.
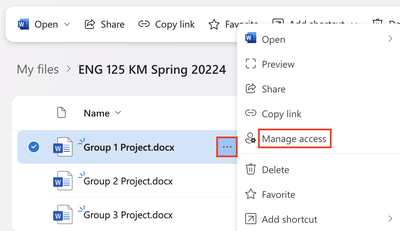
5. In your course folder, next to the file, e.g. Group 1 Project, click the 3-dot icon and then select "Manage access."
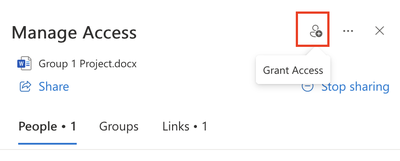
6. On the pop-up box, click the "Grant Access" icon on the top right.
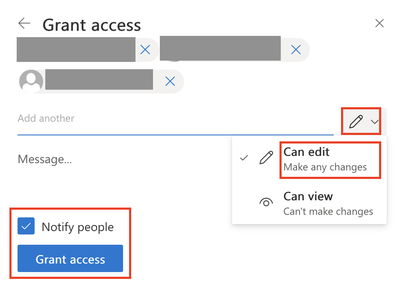
7. Type in your student name, the corresponding email or CUNY login username will appear. Select it. Make sure that it shows a pencil icon on the right of the name, which means the student can edit the file. Repeat it to add all members in the group. In this example, it is group 1. For privacy, we block the student names in the screenshot below.
After you finish adding all group members, check the box for "Notify people" and click "Grant access" button.
Now the group members can access and edit the file.
Repeat steps 5, 6 and 7 to give edit access for members in other gorups to their respective group files.
Creating links in your BrS course to the collaborate group files on OneDrive
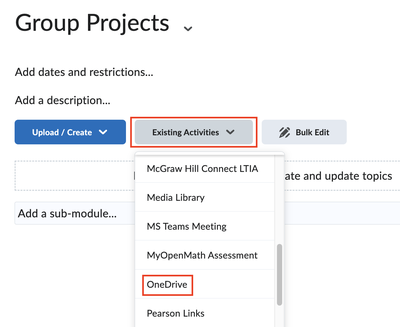
1. Go to your course in BrS. Click Content on the top navigation bar. Create a module called "Group Projects" or any name appropriate.
2. On the newly created module page, click "Existing Activities" > OneDrive.
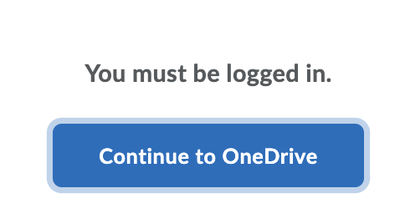
3. A pop-up window appears asking you to log in. Click "Continue to OneDrive" button.
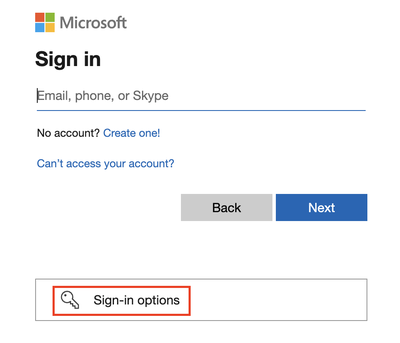
4. Select "Sign-in options."
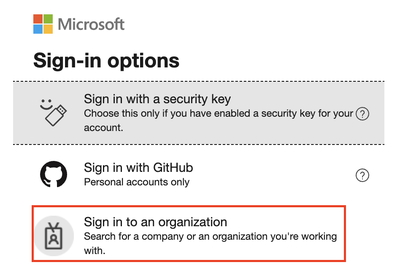
5. Click "Sign in to an organizations."
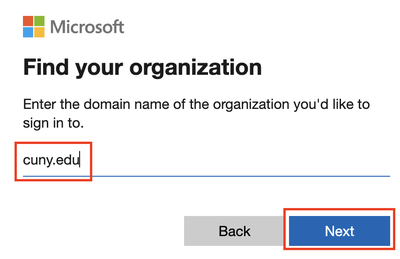
6. Type in cuny.edu above the blue line and click Next.
7. Follow the screen instructions to complete the 2-factor authentication. Afterwards, you will see your file folders in your OneDrive. This is one-time process. From now on, you don't need to go through the sign-in process.
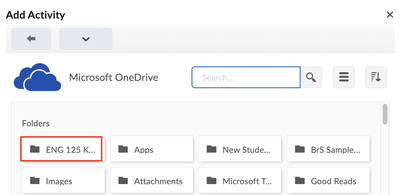
8. Click the folder where you store the group project files.
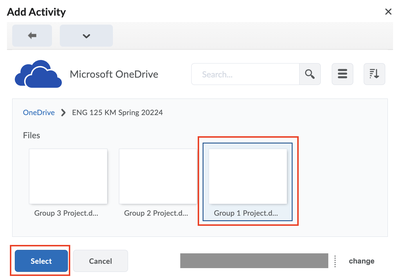
9. Select the file/document you want group members to work on. In this example, it is the Group 1 Project file. Click Select button.
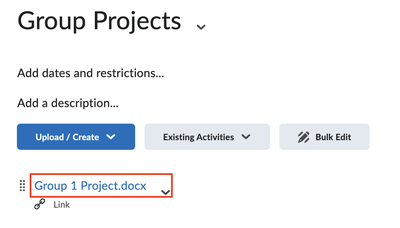
Now you are back to your course content page for the Group Projects and the link to the OneDrive file for group 1 is posted there. Members in Group 1 can click the link to access and work on the file.
Repeat steps 2, 3, 8 and 9 to post links to respective OneDrive files for the rest of the groups.
York College / CUNY
94 - 20 Guy R. Brewer Blvd.
Jamaica, NY 11451
P: 718-262-2000
![]()
![]()
![]()
![]()
![]()
