
Individual Activities and Assignments
Tutorials on creating learning activities and assignments in BrS that students complete individually.
To access BrS, go to https://brightspace.cuny.edu/ page and log in with your CUNY Login username and password. Bookmark this page on your favorite browser so that you can access it easily at any time.
Linking the grade of an assignment to an appropriate grading category
Before you dive into creating any type of assignments, learn how to link the assignment grade with the appropriate grading category. This step will ensure the weighted total calculation is correct.
If you haven't created grading categories, please follow the steps in the Create a grade category tutorial to create grading categories based on your syllabus.
When you create a graded assignment, quiz, or a discussion forum topic, you will need to tell BrS if it belongs to a grading category.
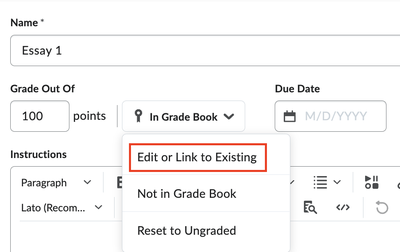
After assigning a number of points for the assignment, click In Grade Book dropdown button and select Edit or Link to Existing link.
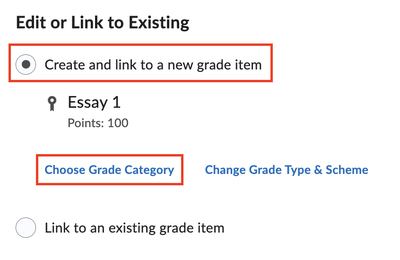
Under Edit or Link to Existing, choose the Create and link to a new grade item radio button and then click Choose Grade Category if you already have the grading categories created and set up in the Grade Book. If not, take a look at our tutorial on Setting Up the Grade Book.
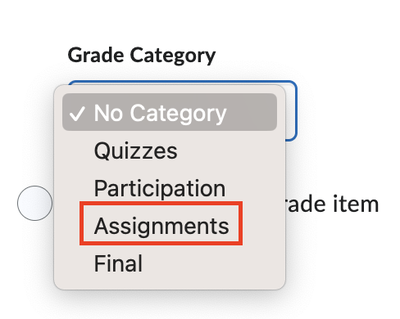
In the dropdown box, select the appropriate category and click OK at the bottom of the pop-up box. In this example, we choose Assignments category.
After you finish setting up other options and click Save, the grade for this assignment will be weighted properly in the Grade Book.
Creating a rubric using the Rubrics tool
You can grade assignments, quizzes and discussion posts with rubrics.
To access the Rubrics tool, on the course top nav bar, click More > Rubrics.
Follow the linked tutorial to create a rubric: Creating a Rubric
Note: you cannot export a rubric from your Bb course and import it here. you will need to build the rubric from scratch.
Creating an assignment
In your BrS courses, you can create an assignment to which students will submit files. The files can be a Word or PDF document, Excel spreadsheet or PowerPoint presentation. Note: this tool doesn't have the capacity to check the similarity of the submitted content with library or internet resources. If you need this feature, use Turnitin.
Something new in BrS
- You can record audio or video as the instruction of the assignment, in addition to text.
- It is easy to set up special access for students who need extra time to complete the assignment by Release Conditions.
You can create an assignment on the Assignments tab in your course top navigation or from a content module.
- If you create it on the Assignments tab, you should add it in the appropriate module in the course content area so that students know when is the time to work on it.
- If you create it in a course content module, the link of the assignment will be added automatically on the Assignmetns tab.
Very Important: if the assignment you are creating belongs to a grading category, you need to set up the link to that category during the process of creating the assignment. Review the steps in Linking the grade of an assignment to an appropriate grading category and follow the steps when creating the assignment as this is not described in the tutorial below.

Creating a quiz and choose appropriate options
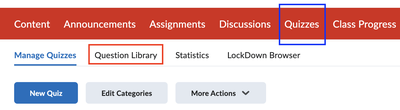
In BrS, it is best to create quz questions in the Question Library, then select questions from the Question Library when creating a quiz. This enables you to set up quizzes to present different questions to different students.
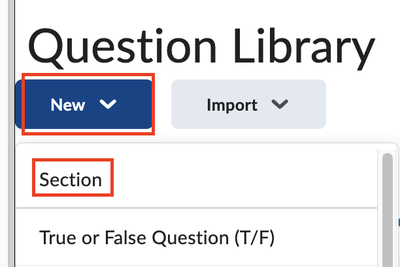
In the Question Library, we recommend using Sections to group questions so that each section has the questions related to the same topics or concepts as well as the same difficulty levels. It can ensure fairness. To create a Section in the Question Library, click Quizzes on the top navigation menu. Then click New > Section. Afterwards, you can add questions in sections.
Something new in BrS
Instructors can set the quiz to make the timer start at the same time for all students. That is, students will take the quiz synchronously.
With Written Response questions, students can answer them in audio or video format.
A long quiz with many questions can be broken down into multiple pages.
To learn how to create a quiz and choose appropriate settings, check out the linked web page below.
To learn how to create different types of quiz questions, check out the linked web page below.
Creating different types of quiz questions from Question Library
Creating a quiz that distributes different questions to different students
It is a good way to avoid students obtaining answers to quiz questions from their peers if you can give different questions to different students. Below are the steps on how to create such a quiz.
1. Click Quizzes on the course top nav bar. Then click Question Library.
2. Click New > Section to create a new section. A section can be considered as a folder. We recommend that you create the questions in each of the sections related to one concept.
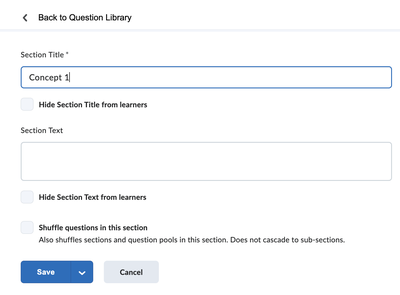
3. Give an appropriate name for the section. The name of the section should tell the topic or concept the questions in the section will test or assess. Click Save.
4. Click the newly created section to enter it, and then add questions that are related to the concept or topic in the section.
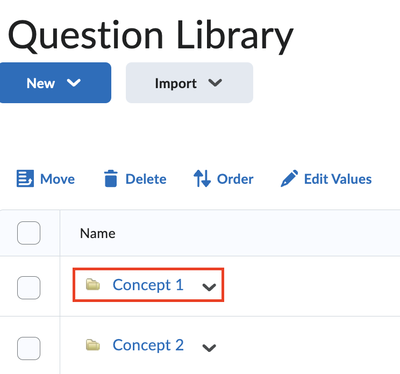
Repeat steps 1 - 4 to create more sections, each is for a specific concept or topic in which you want to assess student learning.
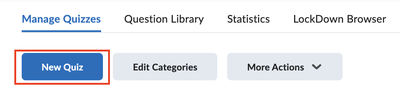
5. Click Quizzes on the top nav bar. Click New Quiz button to create a new quiz.
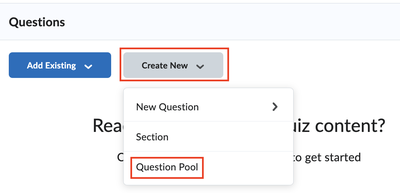
6. Click Create New > Question Pool.
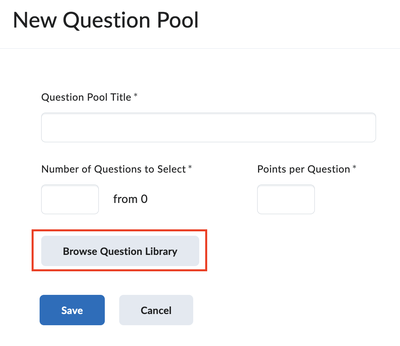
7. On the pop-up box, click Browse Question Library button.
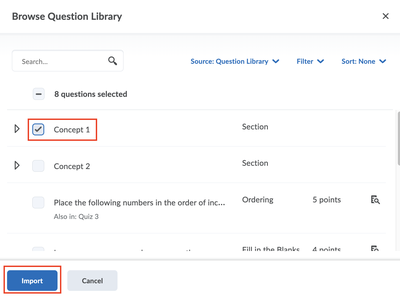
8. Check the box to select the questions in a specific section. Then click Import.
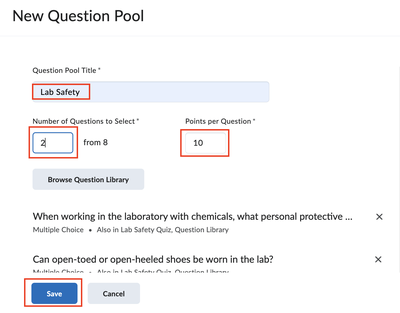
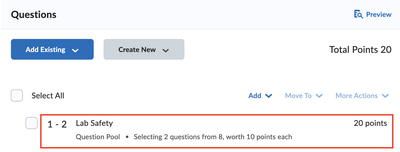
9. Now all the questions in that specific section are added into the question pool. In this example, there are 8 questions. Type in a Question Pool Title, enter the Number of Questions to Select for each of the quiz attempts by students, enter the possible Points per Question. Click Save.
10. Now, you can see that randomly selected 2 questions from a question pool related to that section is added in your quiz.
Repeat steps 6 - 10 to add more questions from different sections to pools in the quiz. After you deploy the quiz, different students will get different questions in different attempts if you allow for more attempts.
Creating a discussion forum and a topic
If you have followed our guide on Building a course from scratch, you already know how BrS structures the discussion tool and how to create forums and topics.
If you haven't, go to the page on Setting up a course from scratch and on that page, click the link on creating a discussion forum and a topic.
Creating a Turnitin assignment
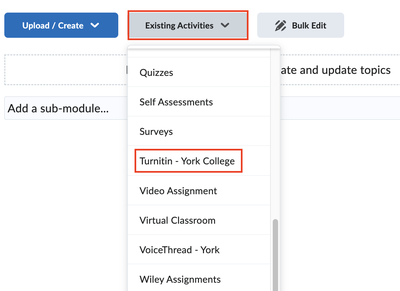
1. Go to your course Content section and then to a content folder where you want to add the Turnitin assignment.
2. Click Existing Activities and then scroll down the pop-up dropdown box to select Turnitin - York College.
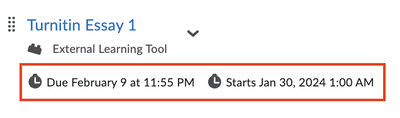
3. On the pop-up Add Activity dialogue box, fill in a Title and Instructions. On the right-hand panel, add Max Grade, set up the Start Date/time when students can submit the assignment, Due Date/time, as well as the Feedback Release Date/time.
Click the Optional Settings with a gear icon to expand that section. Review all optional settings and modify any when necessary. After all is done, click the Submit button.

The Turnitin assignment is created. Click on the Due and Start dates to modify if necessary. A grade column is also created in the Grades page automatically.
Creating a journal assignment
BrS doesn't have a specific journal tool. However, you can create a group discussion with single member enrollment to enable journal-like space where students have their private place to write and create their learning jounal.
Follow the steps below to create a journal assignment.
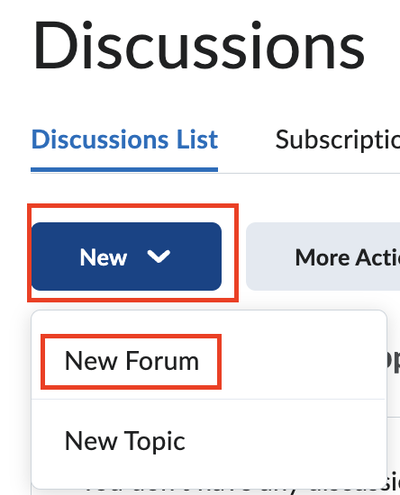
1. Click Discussions on the course top navigation menu.
2. Click New and then select New Forum.
3. Type in a Title. In the Description text box, add instructions.
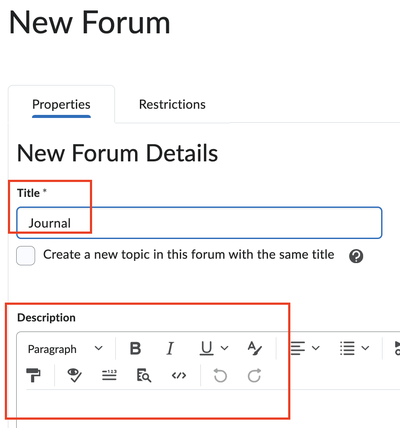
4. Click Save and Close at the bottom of the page.
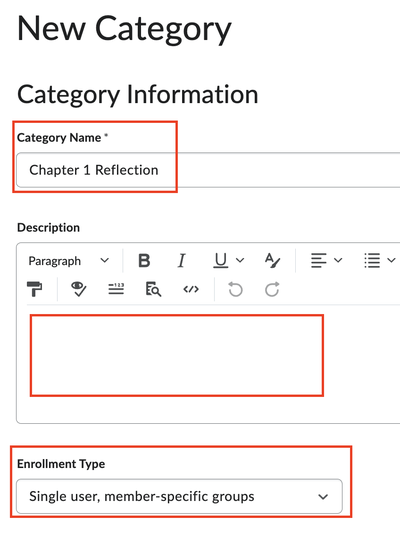
5. On the coure top navigation bar, click Groups.
6. On the Manage Groups page, click New Category.
- If you want students to write multiple journals in a semester and grade each of them, you should create separate group categories so that each journal assignment has a grade column.
- If you want to give one grade for the journal assignment in the entire semester, you just need to create one group category.
7. Add a Category Name, a Description. For the Enrollment Type, choose Single user, member-specific groups.
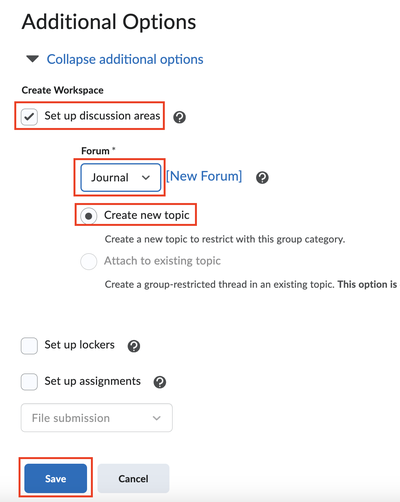
8. Scroll down to the Additional Options section. Check the box for Set up discussion area. Under Forum, select the Journal forum that was just created in the Discussions page. Check the radio button for Create new topic. When all done, click Save.
Now the groups are created, each has one student with their name as the group name. Students can access the journal wither from the Groups page or from the Discussions page.
Adding a grade column for the journal assignment
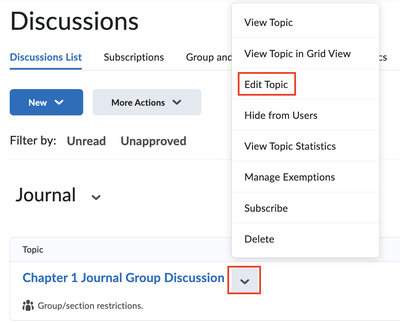
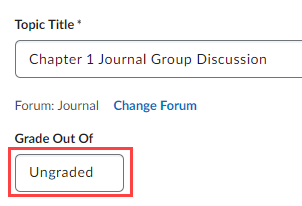
1. On the course top navigation bar, click Discussions.
2. Find the Journal forum. Next to the forum topic, click the down arrow and select Edit Topic.
3. On the Edit Topic page, click on Ungraded.
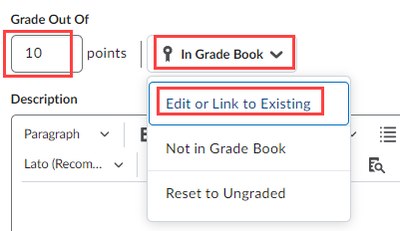
4. You will see a text box to fill in the number of points. By default, the grade column will be added for this discussion topic In Grade Book. But, if this assignment belongs to a specific category defined in your syllabus, you should choose Edit or Link to Existing in the dropdown to link this grade item to the corresponding category. To learn how to link a grade item to a category, check out our tutorial on Linking the grade of an assignment to an appropriate category.
5. Click Save and Close at the bottom of the page. Now you should see this grade item appears on the Grades page.
York College / CUNY
94 - 20 Guy R. Brewer Blvd.
Jamaica, NY 11451
P: 718-262-2000
![]()
![]()
![]()
![]()
![]()
